
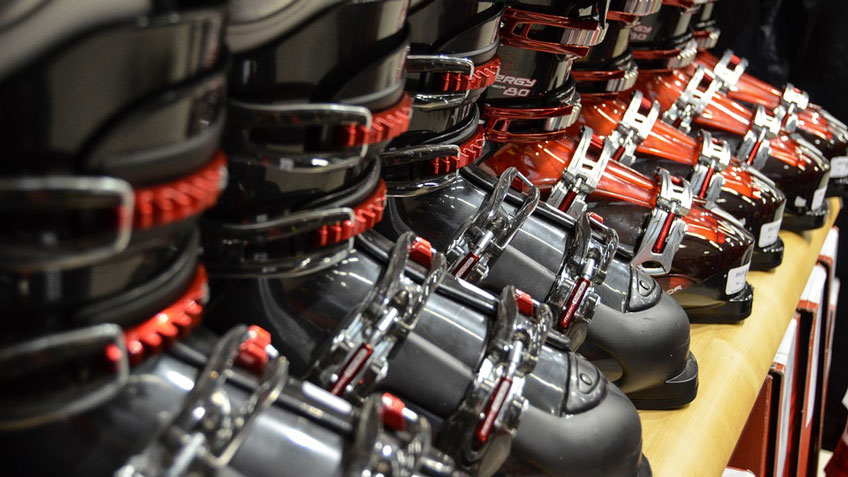
If you’re just starting out with snowboarding, you’re probably a little flustered with choosing equipment. Even picking out the right apparel to wear can make your head spin! Besides the snowboard and bindings, you also need a good pair of snowboard boots all working together in tandem for the best snowboarding experience possible. However, you should put a little more consideration into choosing snowboard boots than anything else since you’ll be riding in them all day. Having a pair that hurts will have you thinking less about shredding the gnar and more about getting off the mountain as soon as possible. We wouldn’t want that! That’s why today, we’ll be talking to you about the most important things to look for in snowboard boots, including how to fit them right. With that said, here is our guide on how to choose snowboard boots. Let’s cruise!
How to Choose Snowboard Boots Infographic
Share This Guide On Your Site
How to Choose Snowboard Boots: In-Depth
Step 1: Find the Right Flex
Snowboard boots have varying levels of flex designed to cater to differing riding styles and levels. Boots are given a rating from 1-10, with 1 being the softest and 10 being the stiffest. The stiffer a boot, the more quickly it transfers energy to your board. On the other hand, softer boots are more forgiving and comfortable which makes them perfect for park riders and those just starting out. However, flex ratings between manufacturers aren’t exactly the same, so keep that in mind as we learn how to choose snowboard boots.
Riding Style
This refers to what type of terrain you like to ride. There are three main categories: freestyle, all-mountain, and freeride/backcountry.
- Freestyle is fun groomed terrain where you like to jump and spin, such as on half-pipes, rails, jumps, spins, jibbing, or doing tricks.
- All-mountain applies to the majority of riders and terrain; those who want a funner rider should look for softer boots while those who like a more aggressive ride should look for a medium stiff flex.
- Freeride/backcountry is for riders who favor the un-groomed backcountry and steep slopes and therefore should opt for a stiffer boot for the best response and speed.
Riding Level
Most beginners should look for a softer snowboard boot as it is more comfortable and allows for more mobility. Although less stable, softer boots are more forgiving for mistakes and landings. For intermediate riders who like big jumps, you can look for a soft-medium to medium boot for a bit more control and response. If you’re an advanced rider, you probably know what you want already, no need for our advice.
| Riding Style | Recommended Flex | Riding Level |
| Freestyle | Soft (1-3) | Beginner/Intermediate |
| All-Mountain | Soft to Medium (4-6) | Intermediate/Advanced |
| Freeride | Stiff (7-10) | Advanced/Expert |
Step 2: Choose a Lacing Option
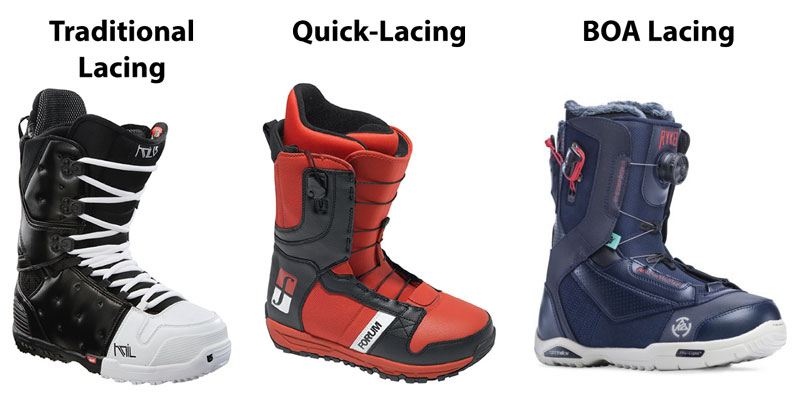
Snowboard boots come in one of three lacing system: classic lacing, speed or quick-pull lacing, and BOA lacing. Let’s talk a little about each.
Classic Lacing
They’re exactly what they sound like, just your standard laces that you can tighten by hand. They offer the most customization in fit (with no pressure points) and are the least expensive option. Easy to replace too although they do take a little more time and effort, and you also have to take your gloves off which sucks in cold weather.
Speed or Quick-Pull Lacing
This type of lacing can be called different names depending on who makes the boot. But, the general idea is that different zones (forefoot/ankle/lower leg) on the boot can be individually tightened with a single handle. This makes than faster and more convenient than traditional laces, and you can do them with your gloves on. However, adjustability is limited and can be difficult to get really tight. There is also the possibility of pressure points.
BOA Lacing
BOA lacing is also fast and easy, although it’ll often be the most expensive option which can make it hard to replace. Boots with BOA lacing rely on a ratcheting dial that adjusts a cable for desired tension. Simply turn the dial to increase tension and pull on the knob to release tension. Boots can feature either single, double, or even triple BOA dials, with multiple ones being able to adjust tension in different zones. Takes less effort/time and you can do them with one hand and gloves on. However, there’s the possibility that they can cause uneven tension and unwanted pressure points.
Step 3: Board Waist Size Compatibility
Compatibility between your snowboard, bindings, and boots is also crucial for the best riding experience. Generally, you’ll want your boots, bindings, and board to have similar flex ratings. Although it isn’t set in stone, it’s good advice when starting off. And as you gain more experience, you’ll have a better idea of what you prefer for each.
When learning how to choose snowboards boots, it’s important that your boots fit into your binding so that they’re comfortable and secure. Any squeezed material when you tighten them means they’re a bad fit. A binding fit that is too loose or too tight also means that they are not compatible. Assuming you picked the right size bindings, there shouldn’t be any problems in this department.
Your boots should also fit your snowboard’s size width-wise, more formally known as the board’s waist width size. Those with larger boots should opt for wider boards while those with smaller boots should choose a narrower board. This is important because you don’t want your toes or heels to hang too far off the edge (it’s okay if they hang off slightly). Too much overhang can cause your boots to touch the snow when carving, which can slow you down, mess up your stability, and make you fall. Too narrow of a board and you won’t be able to properly turn that well.
| Boot Size (US Men’s) | — | 6.0-8.0 | 8.0-9.5 | 9.5-10.5 | 10.5-12.5 | >12.5 |
| Boot Size (US Women’s) | <6.0 | 6.0-8.5 | 8.5-10.0 | >10.0 | — | — |
| Width (in mm) | 225-235mm | 235-245mm | 245-250mm | 250-255mm | 255-265mm | >265mm |
| Snowboard Width | Narrow/Women’s | Narrow | Regular | Regular | Mid-Wide | Wide |
Step 4: Select Your Tech
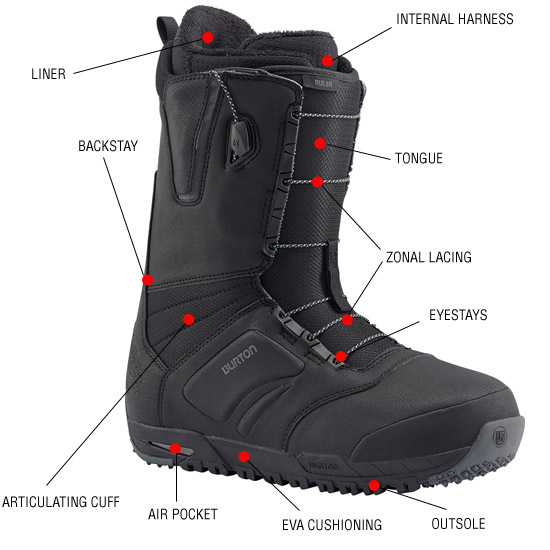 Liners - Refers to the whole inner boot. Liners play a huge role on how boots feel. Often made of EVA foam, liners keep your feet warm, comfy, and supported. Some liners are also removable making them easy to dry when they get soaked. There are also moldable and heat-moldable liners aside from your standard liners that allow for a custom fit and more comfort, although they’ll cost more.
- Midsole - Located between the insole and outsole, a midsole offers lightweight cushioning and energy absorption. Most midsoles are made of EVA. If you mostly ride park and freestyle, you’ll want a thicker midsole that can handle heavier impacts.
- Insole- Most default insoles that come with boots are pretty barebones. If the original insoles are removable, you can always add your own after-market insoles for more comfort, support, or cushioning.
- Outsole - Refers to the very bottom of the boot. If you’ll be hiking in the backcountry often, look for boots with big lugs. They provide better traction, support, and durability.
- Internal Harness - Some boots feature an internal harness that wraps around the liner of the boot for more security.
- Backstay - Support located at the back of the boots to prevent backwards flexing.
- Articulating cuff - A feature that allows boots to flex at the ankle without distortion for more comfort and response.
- Zonal lacing - As mentioned above, some boots offer zonal lacing that can offer a better fit throughout the entire foot.
- Tongue - A foot-fitting tongue can help provide less bulk, more natural flex, and better support.
- Upper Materials - Most boots are synthetic, although higher-end boots will feature leather.
- Budget - More expensive boots will have better materials and technology meant for the advanced rider. Meaning, if you’re a beginner, you don’t need the most expensive boots you can find. However, don’t spend too little as well since durability and performance could be issues.
Step 5: Find The Right Fit
Signs of a Perfect Fit
- No pain, pressure points, or loss of circulation
- Snug fitting with enough room to wiggle your toes
- Locked down heel with no movement or heel lift
- Big toe barely touches the end of the boot
- Enough volume and width for your feet
- Walking in them causes no pain or discomfort
How to Size Snowboard Boots
- Your street shoe size should serve as a starting point at best
- Take into account that boots loosen up as they break in
- Try on multiple pairs instead of buying the first ones that feel good
- Flex boots in a variety of positions to make sure there is no discomfort
- Wear the socks you intend to wear while fitting boots
- Try boots on in-store for the best fit (then buy them online if they’re cheaper)


